Data Graph
Unify requires a Business tier account and is included with Engage.
See the available plans, or contact Support.
The Data Graph acts as a semantic layer that enables businesses to define relationships between various entity datasets in the warehouse — such as accounts, subscriptions, households, and products — with the Segment Profile. It makes these relational datasets accessible to business teams for targeted and personalized customer engagements. The Data Graph powers both Linked Audiences and Linked Events.
- Linked Audiences: Empowers marketers to effortlessly create targeted audiences by combining behavioral data from the Segment Profile and warehouse entity data within a self-serve, no-code interface. This tool accelerates audience creation, enabling precise targeting, enhanced customer personalization, and optimized marketing spend without the need for constant data team support. The Data Graph is used in Linked Audiences for defining relationships between warehouse tables and views, which are then used to build audiences of Segment Profiles.
- Linked Events: Enables data teams to enrich event streams in real time using datasets from data warehouses or lakes, and send these enriched events to any destination. Linked Events is available for both Destination Actions and Functions. The Data Graph is used in Linked Events to specify which tables to use in enrichments.
Prerequisites
To use the Data Graph, you need the following:
- A supported data warehouse with the appropriate Data Graph permissions
- Workspace Owner or Unify Read-only/Admin and Entities Admin permissions
- For Linked Audiences, set up Profiles Sync in a Unify space with ready-to-use data models and tables in your warehouse. When setting up selective sync, Segment recommends the following settings:
- Under Profile materialized tables, select all the tables (
user_identifier,user_traits,profile_merges) for faster and more cost-efficient Linked Audiences computations in your data warehouse. - Make sure to include the unmaterialized tables as well. Segment needs them during setup to understand your schema.
- Under Track event tables, select Sync all Track Call Tables to enable filtering on event history for Linked Audiences conditions.
- Under Profile materialized tables, select all the tables (
To define entity relationships, you need to enable Linked Audiences. Contact your Customer Success Manager to get access to Linked Audiences.
Step 1: Set up Data Graph permissions in your data warehouse
Data Graph, Reverse ETL, and Profiles Sync require different warehouse permissions.
To get started with the Data Graph, set up the required permissions in your warehouse. Segment supports the following:
- Linked Audiences: BigQuery, Databricks, Redshift, and Snowflake
- Linked Events: BigQuery, Databricks, Redshift, and Snowflake
To track the data sent to Segment on previous syncs, Segment uses Reverse ETL infrastructure to store changes between audience computes in tables within a dedicated schema called _segment_reverse_etl in your data warehouse. You can choose which database or project in your warehouse this data lives in.
Step 2: Connect your warehouse to the Data Graph
To connect your warehouse to the Data Graph:
- Navigate to Unify > Data Graph. This should be a Unify space with Profiles Sync already set up.
- Click Add warehouse.
- Select your warehouse type.
- Enter your warehouse credentials.
- Test your connection, then click Save.
Step 3: Build your Data Graph
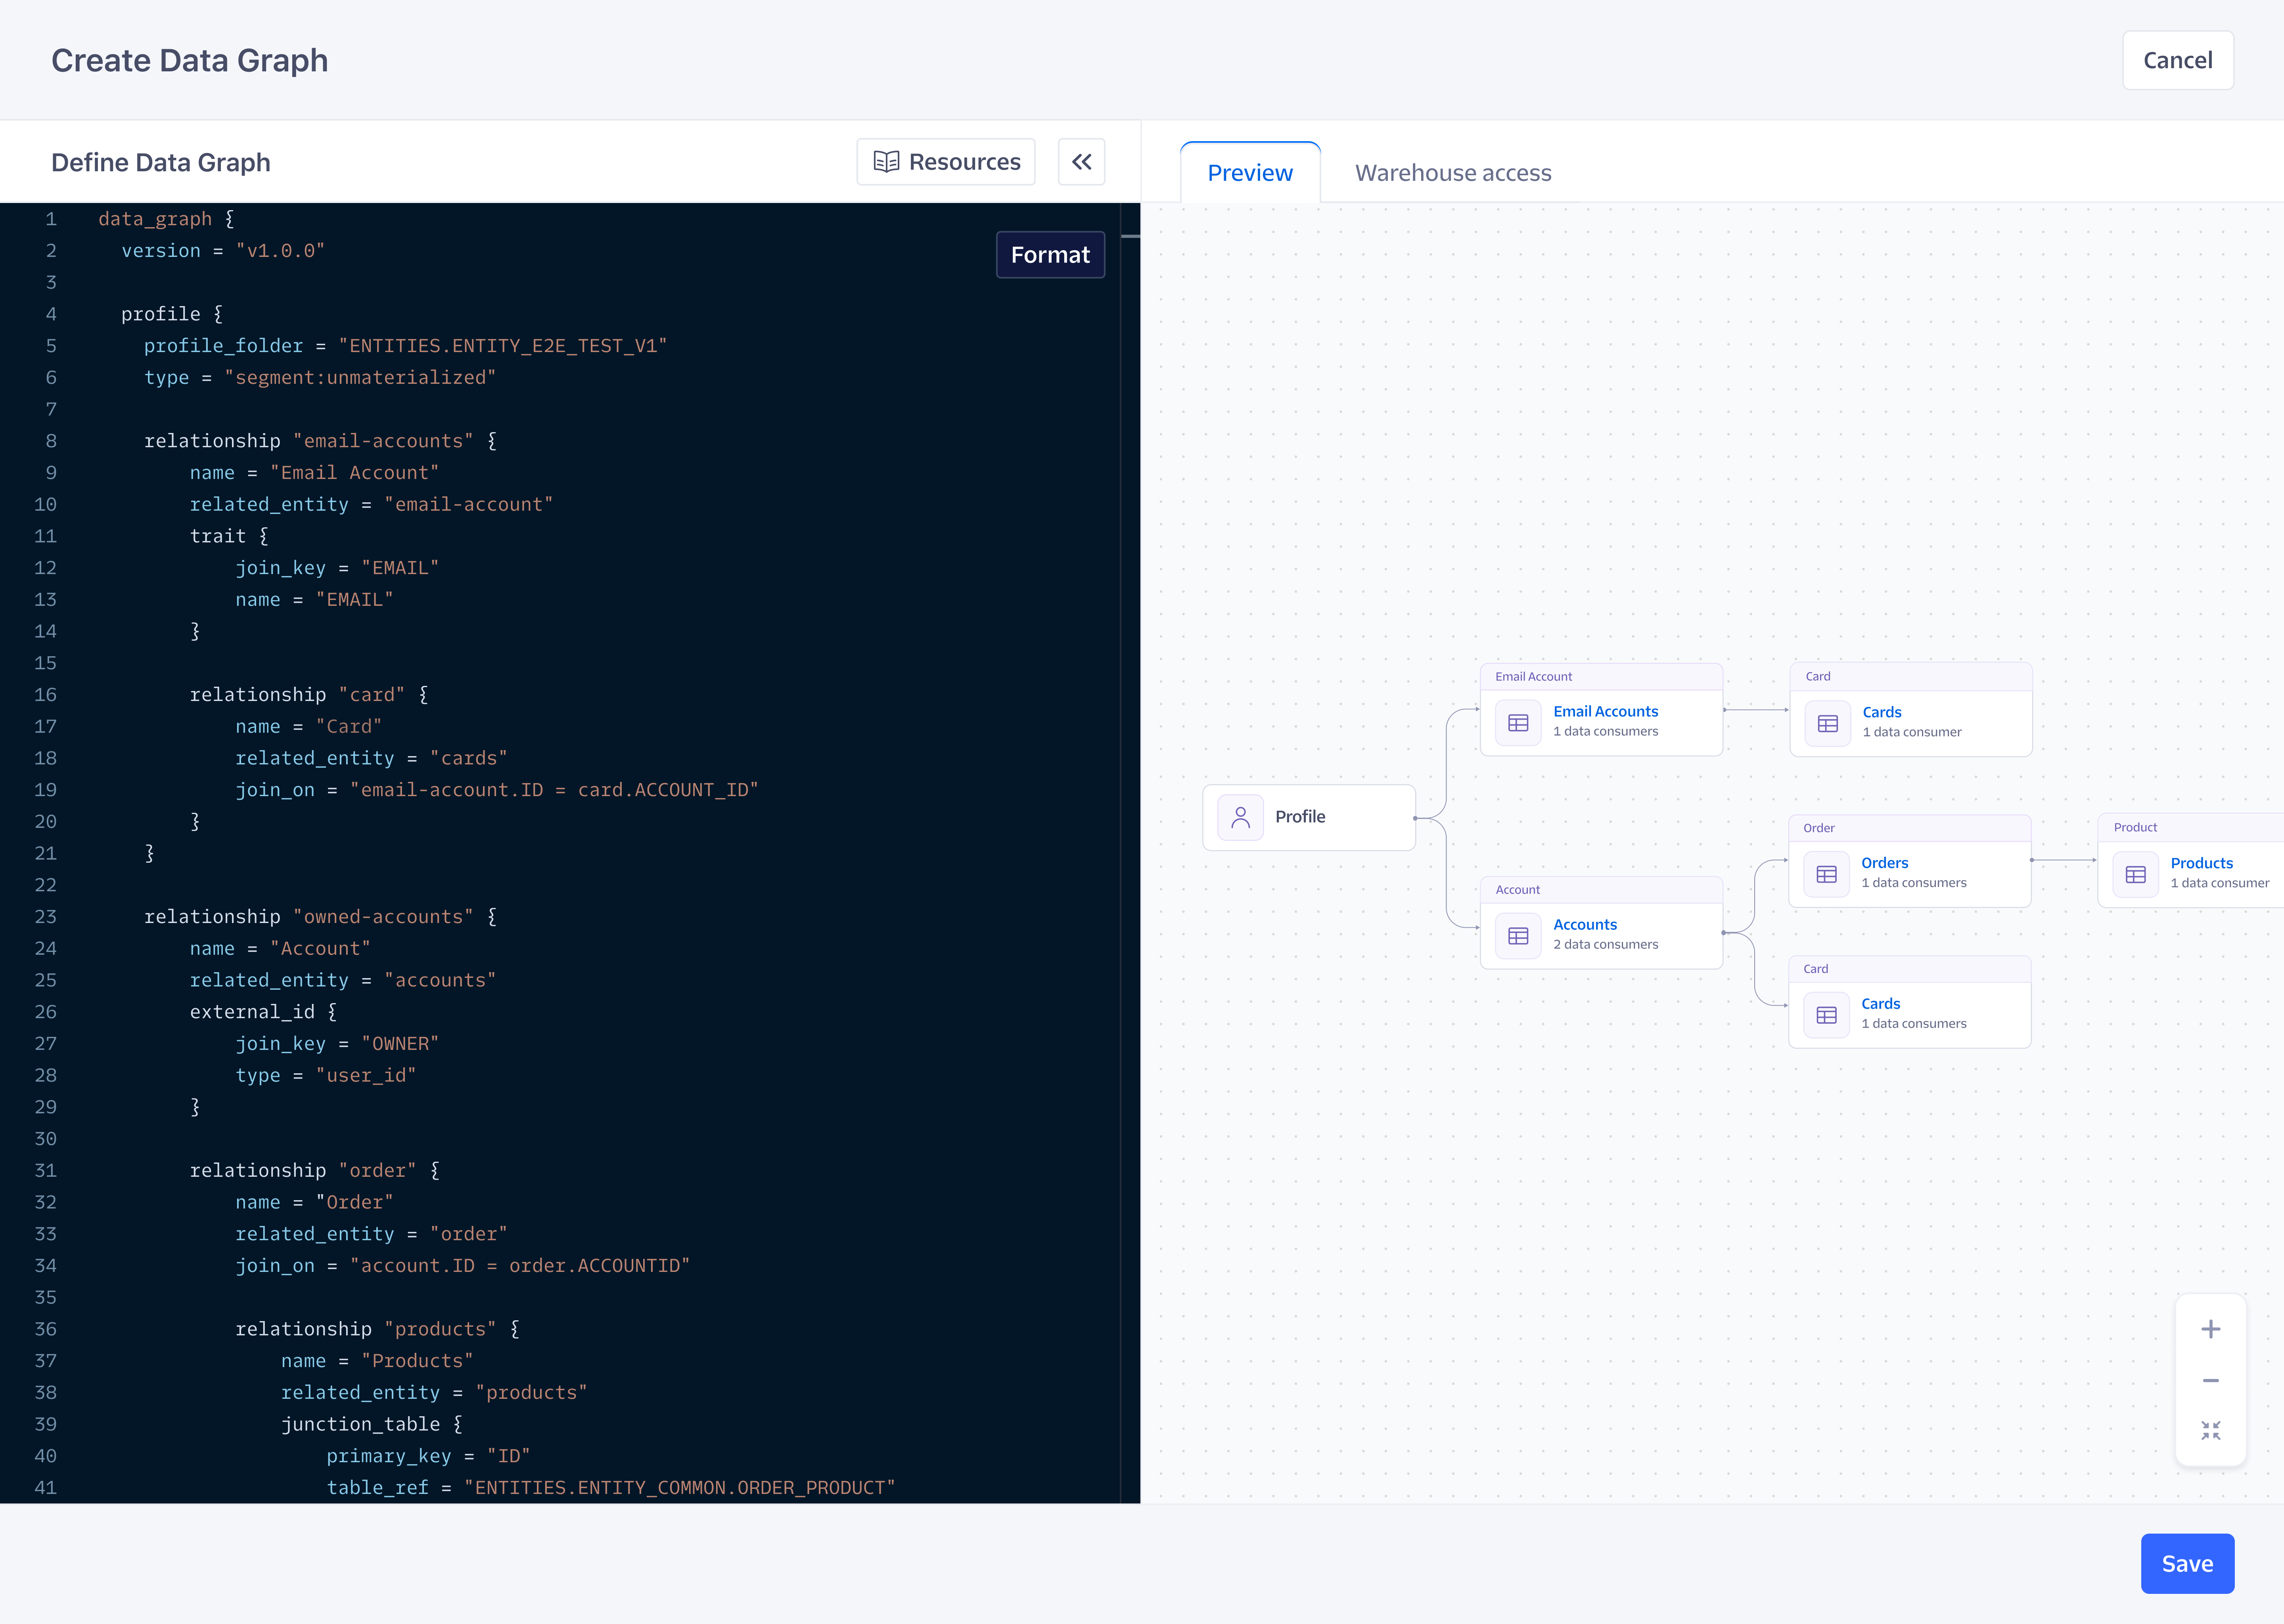
The Data Graph is a semantic layer that represents a subset of relevant business data that marketers and business stakeholders can use for audience targeting and personalization in downstream tools. There are 2 ways to build the Data Graph:
Segment recommends you to use the visual builder for most use cases because it helps to explore, understand, and update entities and relationships interactively. However, some teams may prefer the code editor for advanced use cases to quickly bulk edit entities or relationships, or to copy the raw configuration into version control systems. The visual builder is the default experience, and you can switch between the two editors as needed by selecting the toggle for Code editor (advanced).
Key steps to build your Data Graph
Follow these key steps to build your Data Graph:
- Define your entities. An entity corresponds to a table, view, or materialized view in your warehouse. If you’re only using Linked Events, this is the only step you need to do. If you’re using Linked Audiences, you’ll need to perform steps 2 and 3 as well.
- Define the profile. This is a special class of entity that represents Segment Profiles, which corresponds to the Profiles Sync tables and models. For Linked Audiences, this allows marketers to filter on profile traits, event history, and so on. Based on your Profiles Sync settings, the Data Graph attempts to define the profile block.
- Define how your datasets are related to each other. The Data Graph preserves these relationships and carries this rich context to the destinations to unlock personalization.
Defining Relationships
Similar to the concept of cardinality in data modeling, the Data Graph supports 3 types of relationships:
- Profile-to-entity relationship: This is the first level of relationship, and is the relationship between your entity table and the Segment Profiles tables. This relationship is required for Linked Audiences because it connects Segment Profiles data with all the entity data you have in your warehouse.
- 1:many relationship: For example, an
accountcan have manycarts, but eachcartcan only be associated with oneaccount. - many:many relationship: For example, a user can have many
carts, and eachcartcan have manyproducts. However, theseproductscan also belong to manycarts.
The Data Graph supports 6 levels of depth (or nodes) starting from the profile. For example, relating the profile to the accounts table to the carts table is 3 levels of depth. There are no limits on the width of your Data Graph or the number of entities. Relationships are nested under the profile. Refer to the example below.
Data Graph Example
data_graph {
    version =  "v1.0.0"

    # Define entities
    entity "account-entity" {
      name = "account"
      table_ref = "PRODUCTION.CUST.ACCOUNT"
      primary_key = "ID"
    }

    entity "product-entity" {
      name = "product"
      table_ref = "PRODUCTION.PROD.PRODUCT_SKUS"
      primary_key = "SKU"
    }

    entity "cart-entity" {
      name = "cart"
      table_ref = "PRODUCTION.CUST.CART"
      primary_key = "ID"
      enrichment_enabled = true
    }

    entity "household-entity" {
      name = "household"
      table_ref = "PRODUCTION.CUST.HOUSEHOLD"
      primary_key = "HOUSEHOLD_ID"
    }

    entity "subscription-entity" {
      name = "subscription"
      table_ref = "PRODUCTION.CUST.SUBSCRIPTION"
      primary_key = "SUB_ID"
    }

    # Define the profile entity, which corresponds to Segment Profiles tables synced with Profiles Sync
    # Use materialized views in Profiles Sync to reduce query costs and speed things up
    profile {
      profile_folder = "PRODUCTION.SEGMENT"
      type = "segment:materialized"

      # First branch - relate accounts table to the profile
      # This is a unique type of relationship between an entity and the profile block
      relationship "user-accounts" {
        name = "Premium Accounts"
        related_entity = "account-entity"
        # Join the profile entity with an identifier (like email) on the related entity table
        # Option to replace with the trait block below to join with a profile trait on the entity table instead
        external_id {
          type = "email"
          join_key = "EMAIL_ID"
        }

        # Define 1:many relationship between accounts and carts
        # for example, an account can be associated with many carts
        relationship "user-carts" {
          name = "Shopping Carts"
          related_entity = "cart-entity"
          join_on = "account-entity.ID = cart-entity.ACCOUNT_ID"

          # Define many:many relationship between carts and products
          # for example, there can be multiple carts, and each cart can be associated with multiple products
          relationship "products" {
            name = "Purchased Products"
            related_entity = "product-entity"
            junction_table {
              primary_key = "ID"
              table_ref = "PRODUCTION.CUSTOMER.CART_PRODUCT"
              left_join_on = "cart-entity.ID = CART_ID"
              right_join_on = "PRODUCT_ID = product-entity.SKU"
            }
          }
        }
      }

      # Second branch - relate households table to the profile by joining with an external ID block
      relationship "user-households" {
        name = "Households"
        related_entity = "household-entity"
        external_id {
          type = "email"
          join_key = "EMAIL_ID"
        }

        # Define 1:many relationship between households and subscriptions
        # for example, a household can be associated with multiple subscriptions
        relationship "user-subscriptions" {
          name = "Subscriptions"
          related_entity = "subscription-entity"
          join_on = "household-entity.SUB_ID = subscription-entity.HOUSEHOLD_ID"
    }
}
Using the Visual Builder
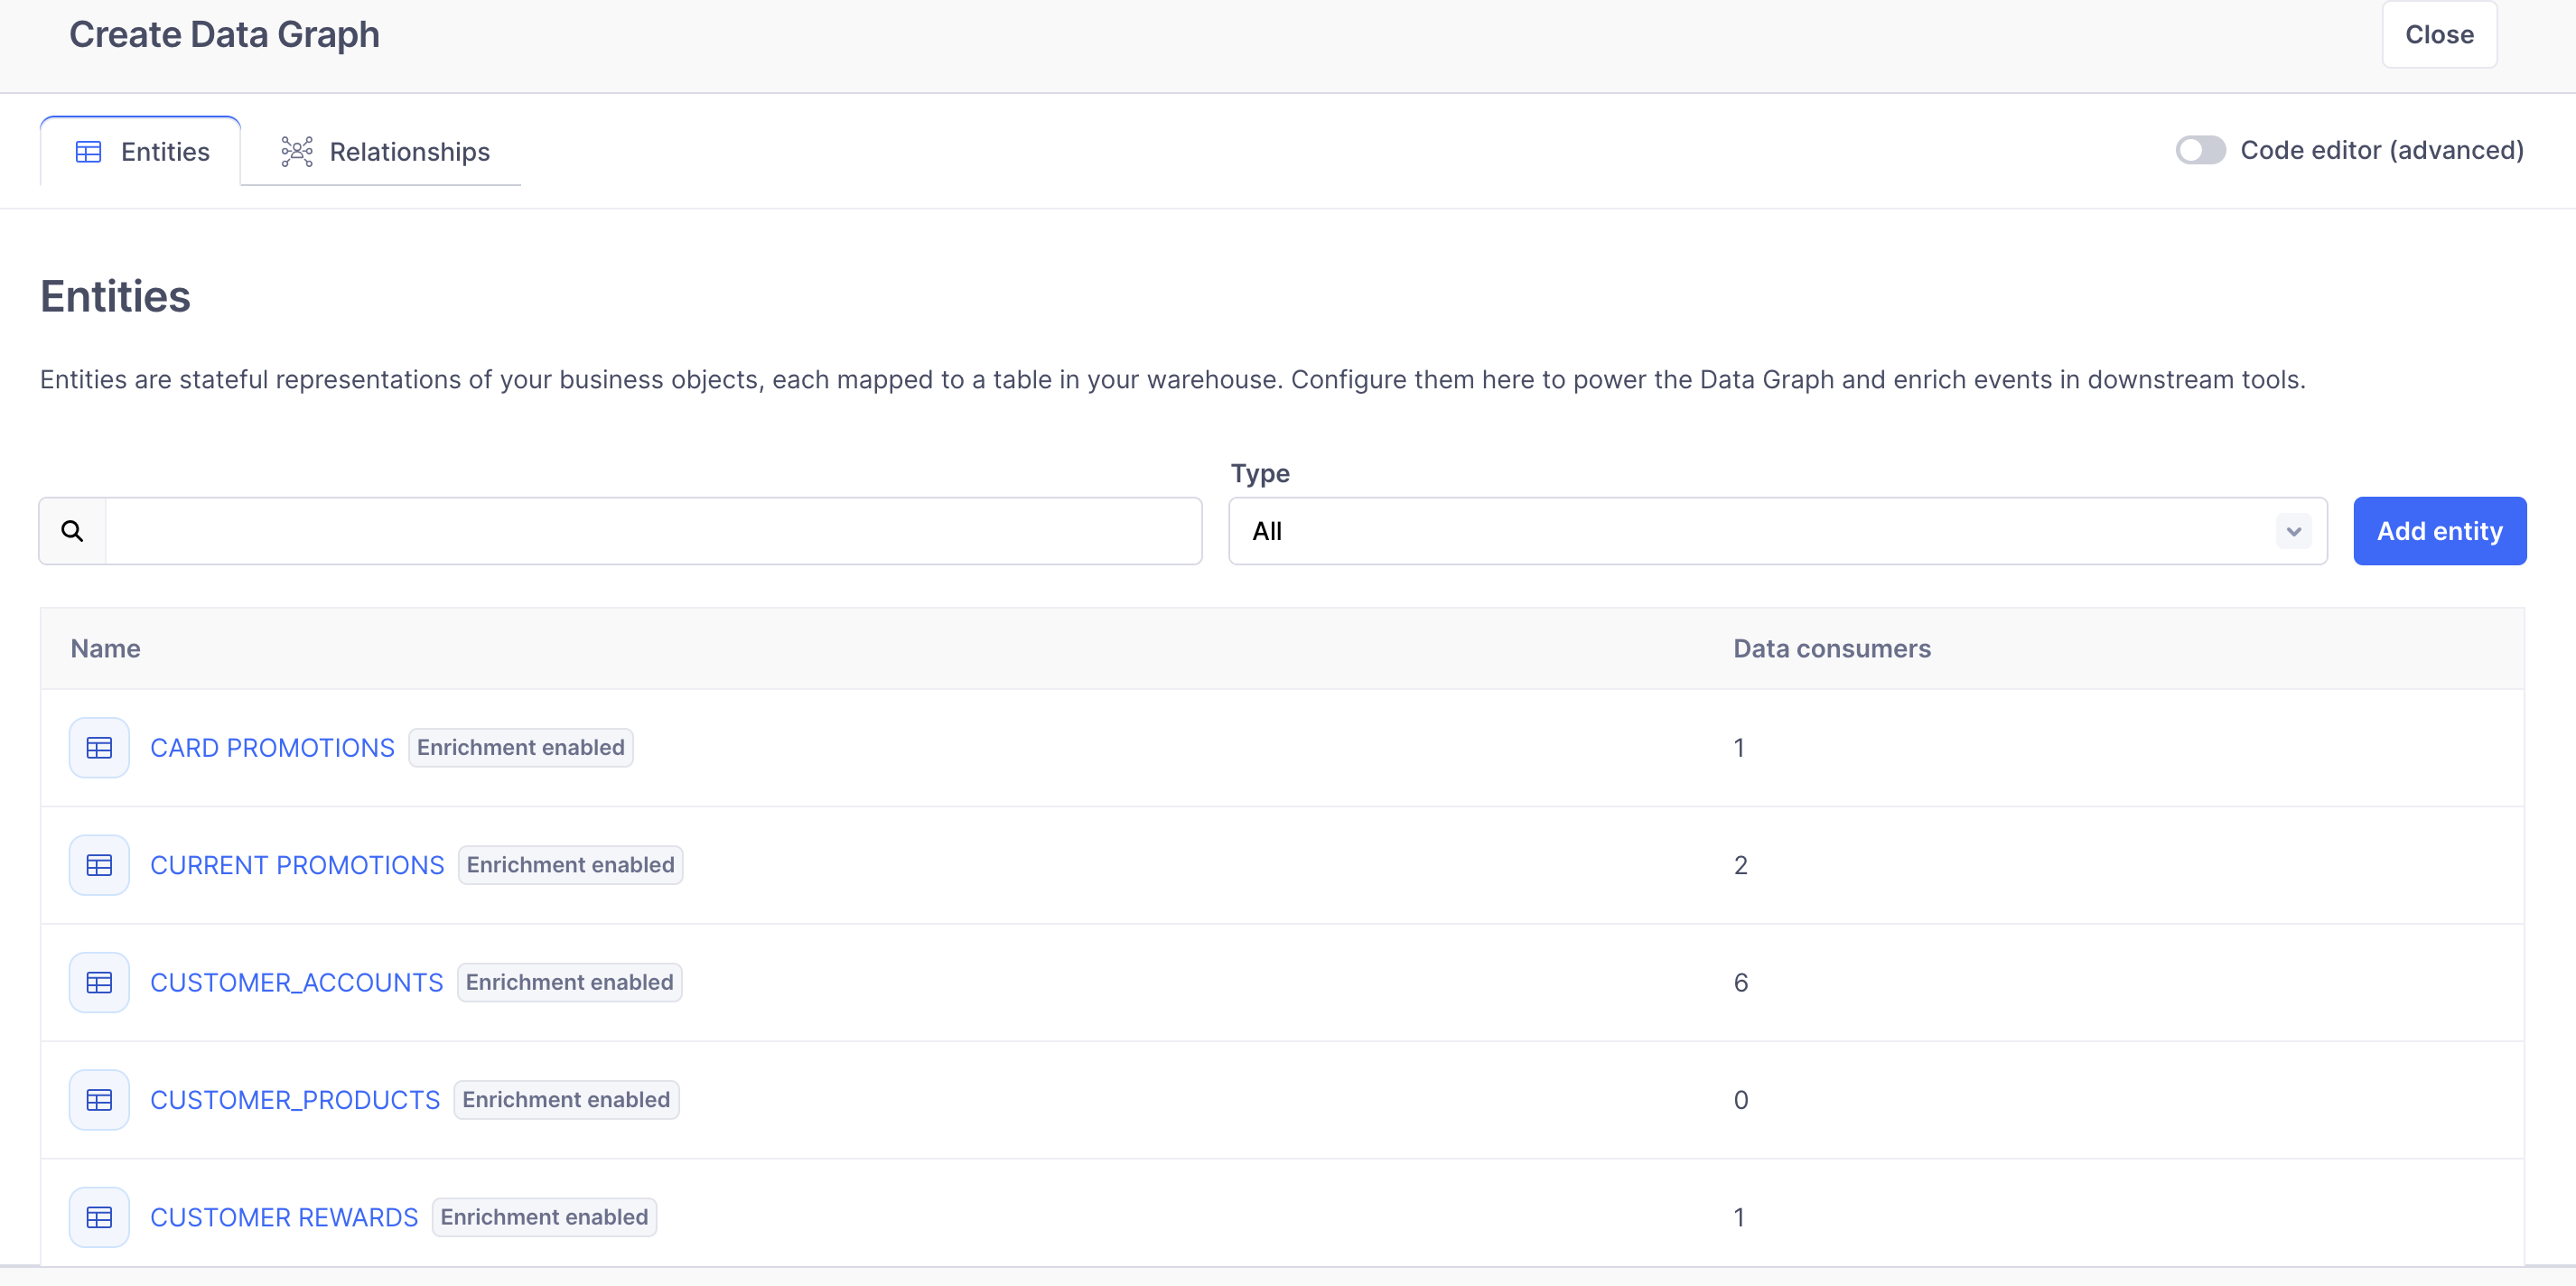
3a: Define entities
The first step in creating a Data Graph is to define your entities. An entity corresponds to a table in the warehouse. If you’re only using Linked Events, you can go directly to Step 4 after this. If you’re using Linked Audiences, you’ll need to perform steps 3b and 3c as well.
To define your entities:
-
Navigate to the Entities tab and select Add Entity.
-
Provide the following information:
Parameter Definition NameA label displayed throughout your Segment space for Linked Events, Linked Audiences. This name can be modified at any time. Table/ViewSelect the table, view or materialized view you’d like to reference. You may also preview the table by selecting the preview icon next to each table or view. Primary KeyThe unique identifier for the given table. Must be a column with unique values per row. Description(Optional)An optional descriptor used to add additional context to the entity (for example, table grain, cadence at which the table/view is refreshed). Use for Linked EventsSelect Yes if you plan to reference the entity table for Linked Events use cases. -
Select Save Entity and repeat as needed.
3b: Define the profile
Segments recommends that you select materialized views under the Profiles Selective Sync settings to optimize warehouse compute costs.
To define the profile, navigate to the Relationships tab. You’ll see a Profile node which is a special class of entity that represents Segment Profiles, which corresponds to the Profiles Sync tables and models. For Linked Audiences, this enables marketers to filter on profile traits, event history, etc. There can only be one profile for a Data Graph.
Segment creates default settings for your profile that are based on your Profiles Sync configuration. If you wish to update these settings, you may select the node and select View / Edit profile. Otherwise, you may proceed to Step 3C.
Profile parameters include:
| Parameter | Defintion |
|---|---|
Profile folder |
Define the fully qualified path of the folder or schema location for the profile tables. Segment will infer this setting based on your Profiles Sync settings. |
Profile type |
Use Materialized to sync materialized views with Profiles Sync. Segment recommends this configuration for all Linked Audiences and Data Graph setups. If you can’t sync materialized views, reach out to Segment support for help. Segment will infer this setting based on your Profiles Sync settings. |
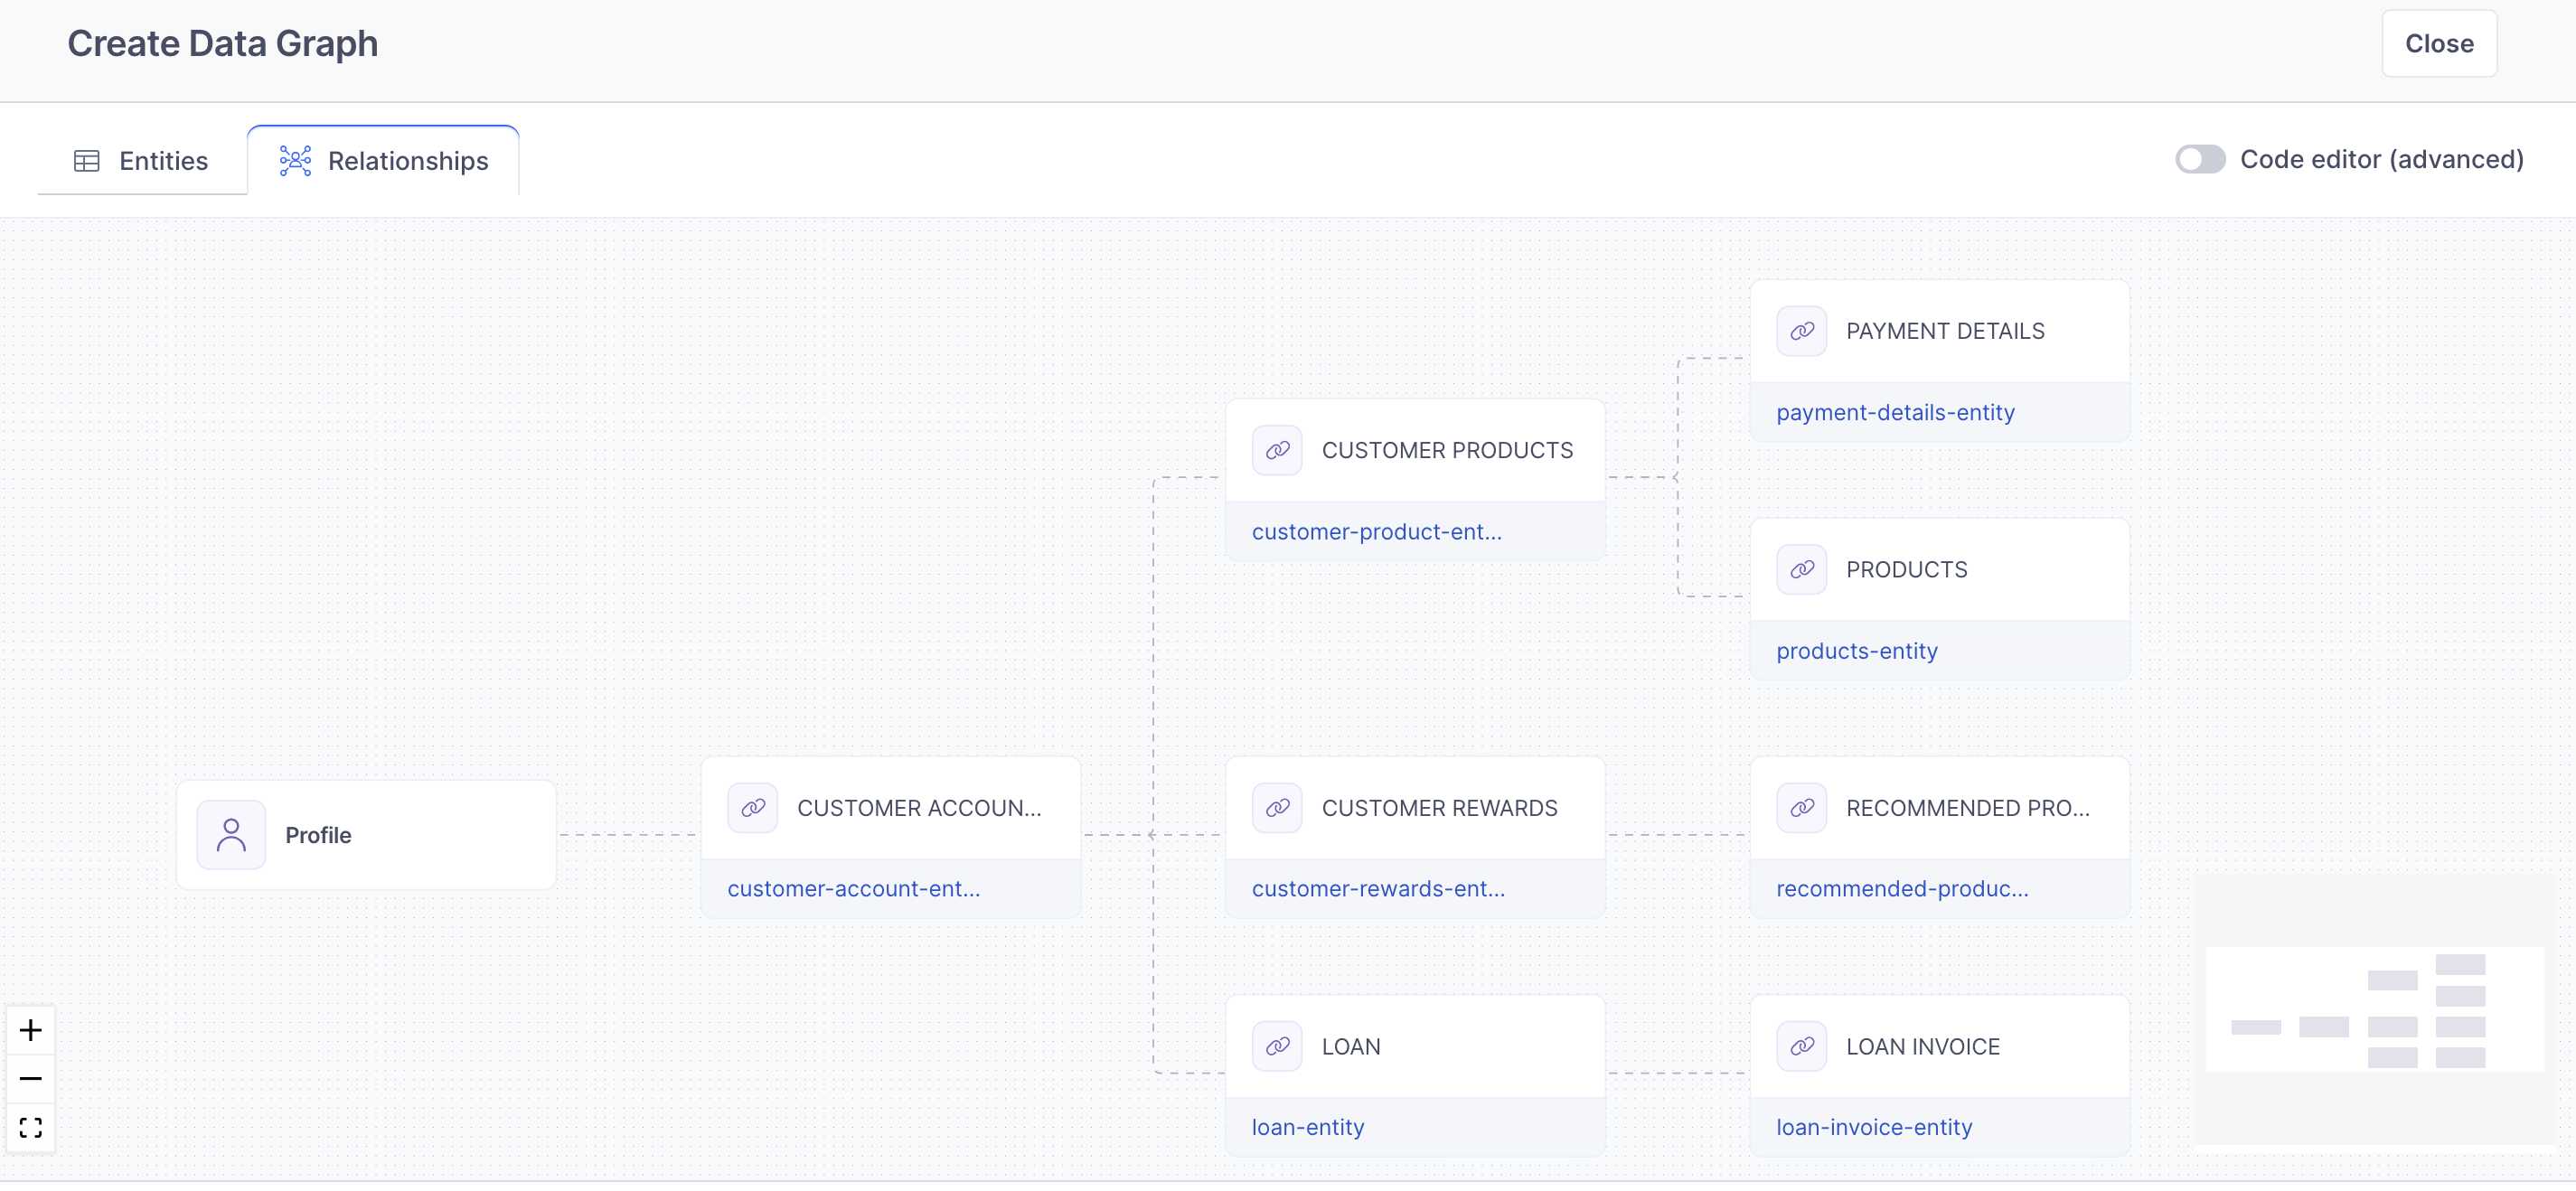
3c: Define relationships
Now define the relationships between your entities. Similar to the concept of cardinality in data modeling, the Data Graph supports 3 types of relationships below. All relationship types require you to define the relationship slug, name, and related entity. Each type of relationship has unique join on conditions.
- Profile-to-entity relationship: This is a relationship between your entity table and the Segment Profiles tables, and is the first level of relationship.
- 1:many relationship: For example, an
accountcan have manycarts, but eachcartcan only be associated with oneaccount. - many:many relationship: For example, a user can have many
carts, and eachcartcan have manyproducts. However, theseproductscan also belong to manycarts.- Note: To add many:many relationships, you need to use the code editor.
Define profile-to-entity relationship
This is the first level of relationships and a unique type of relationship between the Segment profile entity and a related entity.
| Parameter | Definition |
|---|---|
Select related entity |
The left-hand-side entity represents the Segment profile. On the right-hand-side, you can select which entity to relate it to. Note: you can select the preview icon to preview both the Segment profile and the associated table or view representing the entity. |
Relationship name |
A label displayed throughout your Segment space for Linked Audiences. This name can be modified at any time. |
Description (Optional) |
An optional descriptor used to add additional context to the relationship. |
Join on external ID or trait |
The Segment external ID or trait you’ll use to join to your entity. To define a profile-to-entity relationship, reference your entity table. Depending on the column in it that you would like to link to your Segment profile, you can select either an external identifier such as user_id, email, or phone or a trait in your Unify Profiles. |
Join key |
The column on the entity table that matches the external ID or trait selected directly above. |
Segment recommends using materialized views with Profiles Sync. However, Segment may still reference unmaterialized tables during setup for schema detection.
If you’re using Profile Type = Materialized for your profile settings, you can click Compute count to check the number of rows returned when joining the profile and entity together based on the join keys you provide using Join on external ID and trait and Join key. This enables you to make sure that entity joins occur correctly while you’re setting up the Data Graph by returning the number of rows produced when joining two associated tables or view.
Define a 1:many relationship
For 1:many relationships, select the relationship node you’d like to add a new relationship to. Select Add relationship. Provide the following information:
| Parameters | Definition |
|---|---|
Select related entity |
The left-hand-side entity represents the entity referenced in the relationship you had previously defined. This is immutable. On the right-hand-side, you can select which entity to relate it to. Note: you can select the preview icon to preview both associated tables or views. |
Join keys |
Defines relationship between the two entity tables – i.e. how they should be joined together. |
Relationship name |
A label displayed throughout your Segment space for Linked Audiences. This name can be modified at any time |
By selecting Compute count, you can check the number of rows returned when joining the two entity tables or views together based on the join keys you provided. This is a good way to ensure results are as expected.
Select Add relationship and repeat as needed.
Using the code editor
Use the configuration language spec and the following features to build your Data Graph:
- Use the Warehouse access tab to view the warehouse tables you’ve granted Segment access to
- Begin typing to autopopulate the configuration spec within the editor, as well as to autocomplete your warehouse schema
- Validate your Data Graph using the Preview tab
3a: Define entities
The first step in creating a Data Graph is to define your entities. An entity corresponds to a table in the warehouse. If you are only using Linked Events, you can go directly to Step 4 after this. If you’re using Linked Audiences, you’ll need to perform steps 3b and 3c as well.
| Parameter | Definition |
|---|---|
entity |
An immutable slug for the entity, and will be treated as a delete if you make changes. The slug must be in all lowercase, and supports dashes or underscores (for example, account-entity or account_entity). |
description (Optional) |
An optional descriptor used to add additional context to the entity (for example, table grain, cadence at which the table/view is refreshed). |
name |
A label displayed throughout your Segment space for Linked Events, Linked Audiences. This name can be modified at any time. |
table_ref |
Defines the fully qualified table reference: [database name].[schema name].[table name]. Segment flexibly supports tables, views and materialized views. |
primary_key |
The unique identifier for the given table. Must be a column with unique values per row. |
enrichment_enabled = true (If applicable) |
Add this if you plan to reference the entity table for Linked Events use cases. |
Example:
data_graph {
    entity "account-entity" {
      name = "account"
      description = "An entity representing user accounts"
      table_ref = "PRODUCTION.CUST.ACCOUNT"
      primary_key = "ID"
    }

    entity "cart-entity" {
      name = "cart"
      table_ref = "PRODUCTION.CUST.CART"
      primary_key = "ID"
      enrichment_enabled = true
    }
}
3b: Define the profile
Segments recommends that you select materialized views under the Profiles Selective Sync settings to optimize warehouse compute costs.
Define the profile. This is a special class of entity that represents Segment Profiles, which corresponds to the Profiles Sync tables and models. For Linked Audiences, this allows marketers to filter on profile traits, event history, etc. There can only be one profile for a Data Graph.
Segment creates default settings for your profile that are based on your Profiles Sync configuration. If you’d like to update these settings, you can select the node and select View / Edit profile. After, move on to Step 3C.
| Parameter | Definition |
|---|---|
profile_folder |
Define the fully qualified path of the folder or schema location for the profile tables. Segment will infer this setting based on your Profiles Sync settings. |
type |
Use segment:materialized to sync materialized views with Profiles Sync. Segment recommends this configuration for all Linked Audiences and Data Graph setups. If you can’t sync materialized views, reach out to Segment support for help. Segment will infer this setting based on your Profiles Sync settings. |
data_graph {
    # Define entities
    ...

    # Define the profile entity, which corresponds to Segment Profiles tables synced via Profiles Sync
    # Recommend setting up Profiles Sync materialized views to optimize warehouse compute costs
    profile {
      profile_folder = "PRODUCTION.SEGMENT"
      type = "segment:materialized"
    }
}
3c: Define relationships
Now define the relationships between your entities. Similar to the concept of cardinality in data modeling, the Data Graph supports 3 types of relationships below. All relationship types require you to define the relationship slug, name, and related entity. Each type of relationship has unique join on conditions.
- Profile-to-entity relationship: This is a relationship between your entity table and the Segment Profiles tables, and is the first level of relationship.
- 1:many relationship: For example, an
accountcan have manycarts, but eachcartcan only be associated with oneaccount. - many:many relationship: For example, a user can have many
carts, and eachcartcan have manyproducts. However, theseproductscan also belong to manycarts.- Note: To add many:many relationships, you need to use the code editor.
Define profile-to-entity relationship
This is the first level of relationships and a unique type of relationship between the Segment profile entity and a related entity.
| Parameter | Definition |
|---|---|
relationship |
An immutable slug for the relationship, and will be treated as a delete if you make changes. The slug must be in all lowercase, and supports dashes or underscores (like user-account or user_account). |
name |
A label displayed throughout your Segment space for Linked Events, Linked Audiences. This name can be modified at any time. |
description (Optional) |
An optional descriptor used to add additional context to the relationship. |
related_entity |
This references the already defined entity. |
To define a profile-to-entity relationship, reference your entity table and depending on your table columns, choose to join on one of the following:
- Option 1 - Join on an external ID (most common): Use the
external_idblock to join the profile entity with an entity table using external IDs from your Unify ID resolution settings. Typically these identifiers areuser_id,email, orphonedepending on the structure of your entity table.type: Represents the external ID type (email,phone,user_id) in your ID resolution settings.- This maps to the
typecolumn in theuser_identifierstable when using materialized views.
- This maps to the
join_key: The column on the entity table that matches the external ID.
Segment recommends using materialized views with Profiles Sync. However, Segment still needs to reference unmaterialized tables during setup for schema detection.
-
Option 2 - Join on a profile trait: Use the
traitblock to join the profile entity with an entity table using Profile Traits.name: Represents a trait name in your Unify profiles. This maps to thenamecolumn in theuser_traitstable when using materialized views.join_key: The column on the entity table that you’re matching to the trait.
Example:
data_graph {
    entity "account-entity" {
      name = "account"
      table_ref = "PRODUCTION.CUST.ACCOUNT"
      primary_key = "ID"
    }

    # Define additional entities...

    # Note: Relationships are nested
    profile {
      profile_folder = "PRODUCTION.SEGMENT"
      type = "segment:materialized"

      # Relate accounts table to the profile
      relationship "user-accounts" {
        name = "Premium Accounts"
        description = "A relationship linking Segment profiles to user accounts"
        related_entity = "account-entity"

        # Option 1: Join the profile entity with an identifier (like email) on the related entity table
        external_id {
          type = "email"
          join_key = "EMAIL_ID"
        }

        # Option 2: Join the profile entity with a profile trait on the related entity table
        trait {
          name = "cust_id"
          join_key = "ID"
        }
      }
    }
}
Select a Data Graph node to see an overview of the relationship and to also confirm what data is in your entity tables or views by previewing the first 10 rows.
Click Compute count to check the number of rows returned when joining the profile and entity together based on the join keys you provide. This enables you to make sure that entity joins occur correctly while setting up the Data Graph by returning the number of rows produced when joining two associated tables or view.
Define 1:many relationship
Define the join between the two entity tables using the spec below.
| Parameter | Definition |
|---|---|
relationship |
An immutable slug for the relationship, and will be treated as a delete if you make changes. The slug must be in all lowercase, and supports dashes or underscores (like user-account or user_account). |
name |
A label displayed throughout your Segment space for Linked Audiences. This name can be modified at any time |
description (Optional) |
An optional descriptor used to add additional context to the relationship. |
related_entity |
References your already defined entity |
join_on |
Defines relationship between the two entity tables [lefty entity slug].[column name] = [right entity slug].[column name]. Note that since you’re referencing the entity slug for the join on, you do not need to define the full table reference. |
Example:
data_graph {
    entity "cart-entity" {
      name = "cart"
      table_ref = "PRODUCTION.CUST.CART"
      primary_key = "ID"
    }

   # Define additional entities...

    # Note: Relationships are nested
    profile {
      profile_folder = "PRODUCTION.SEGMENT"
      type = "segment:materialized"

      relationship "user-accounts" {
        ...

        # Define 1:many relationship between accounts and carts
        relationship "user-carts" {
          name = "Shopping Carts"
          description = "A relationship linking user accounts to carts"
          related_entity = "carts-entity"
          join_on = "account-entity.ID = cart-entity.ACCOUNT_ID"
        }
      }
    }
}
Select a Data Graph node to see an overview of the relationship and to also confirm what data is in your entity tables or views by previewing the first 10 rows.
Click Compute count to check the number of rows returned when joining the profile and entity together based on the join keys you provide. This enables you to make sure that entity joins occur correctly while you’re setting up the Data Graph by returning the number of rows produced when joining two associated tables or view.
Define many:many relationship
For many:many relationships, define the join on between the two entity tables with the junction_table.
Attributes from a junction table are not referenceable via the Linked Audience builder. If a marketer would like to filter upon a column on the junction table, you must define the junction as an entity and define a relationship.
| Parameter | Definition |
|---|---|
relationship |
An immutable slug for the relationship, and will be treated as a delete if you make changes. The slug must be in all lowercase, and supports dashes or underscores (like user-account or user_account). |
name |
A label displayed throughout your Segment space for Linked Audiences. This name can be modified at any time. |
description (Optional) |
An optional descriptor used to add additional context to the relationship. |
related_entity |
This references your defined entity. |
Junction table spec
| Parameter | Definition |
|---|---|
table_ref |
Defines the fully qualified table reference to the join table: [database name].[schema name].[table name]. Segment flexibly supports tables, views and materialized views. |
primary_key |
The unique identifier for the given table. Must be a column with unique values per row. |
left_join_on |
Defines the relationship between the left entity table and the junction table: [left entity slug].[column name] = [junction table column name]. Note that schema and table are implied within the junction table column name, so you do not need to define it again. |
right_join_on |
Define the relationship between the junction table and the right entity table: [junction table column name] = [right entity slug].[column name]. Note that schema and table are implied within the junction table column name, so you do not need to define it again. |
When you define a many-to-many relationship using a junction table, left_join_on and right_join_on tell Data Graph how to connect each entity to the junction table:
- Use
left_join_onto specify which column in the junction table links to the parent (left) entity. - Use
right_join_onto specify which column links to the child (right) entity.
These fields define the join conditions, but they don’t control how the join is executed. Data Graph always performs inner joins, even if you specify a left_join_on.
If you need behavior similar to a left join (like including unmatched rows), create a view in your warehouse with the logic you’re targeting and reference that view as an entity in your graph.
Example:
data_graph {
    # Define entities

    # Note: Relationships are nested
    profile {
      # Define profile

      relationship "user-accounts" {
        ...

        relationship "user-carts" {
          ...

          # Define many:many relationship between carts and products
          relationship "products" {
            name = "Purchased Products"
            description = "A relationship linking user carts to products via the CART_PRODUCT junction table"
            related_entity = "product-entity"
            junction_table {
              table_ref = "PRODUCTION.CUSTOMER.CART_PRODUCT"
              primary_key = "ID"
              left_join_on = "cart-entity.ID = CART_ID"
              right_join_on = "PRODUCT_ID = product-entity.SKU"
            }
          }
        }
      }
  }
}
Select a Data Graph node to see an overview of the entity and to also confirm what data is in your entity tables or views by previewing the first 10 rows.
Click Compute count to check the number of rows returned when joining the profile and entity together based on the join keys you provide. This enables you to make sure that entity joins occur correctly while you’re setting up the Data Graph by returning the number of rows produced when joining two associated tables or view.
Step 4: Validate your Data Graph
You can validate your Data Graph by selecting Save. After you’ve set up your Data Graph, your partner teams can start leveraging these datasets with Linked Events and Linked Audiences.
Edit and manage your Data Graph
There are 2 ways to edit the Data Graph:
- Using the visual (no-code) builder
- Using the code editor
Segment recommends using the visual builder for most use cases because it helps to explore, understand, and update entities and relationships interactively. However, some teams may prefer the code editor to quickly bulk edit entities or relationships, or to copy the raw configuration into version control systems. The visual builder is the default experience, and you can switch between the two editors as needed.
To edit your Data Graph:
- Navigate to Unify > Data Graph.
- Select the Overview tab, and click Edit Data Graph.
View Data Graph data consumers
A data consumer refers to a Segment feature like Linked Events and Linked Audiences that are referencing datasets, such as entities and/or relationships, from the Data Graph. You can view a list of data consumers in two places:
- Under Unify > Data Graph, click the Data consumers tab
- Under Unify > Data Graph > Overview or the Data Graph editor in either the visual builder or in the code editor preview, click into a node on the Data Graph preview and a side sheet will pop up with the list of data consumers for the respective relationship.
Understand changes that may cause breaking and potential breaking changes
Upon editing and saving changes to your Data Graph, a modal will pop up to warn of breaking and/or potential breaking changes to your data consumers. You must acknowledge and click Confirm and save in order to proceed.
- Definite breaking change: Occurs when deleting an entity or relationship that is being referenced by a data consumer. Data consumers affected by breaking changes will fail on the next run. Note: The entity and relationship slug are immutable and treated as a delete if you make changes. You can modify the name.
- Potential breaking change: Some changes such as updating the entity
table_reforprimary_key, may lead to errors with data consumers. If there’s a breaking change, the data consumer will fail on the next run. Unaffected data consumers will continue to work.
Detect warehouse breaking changes
Segment has a service that regularly scans and monitors the Data Graph for changes that occur in your warehouse that may break components of the Data Graph, like when the table being referenced by the Data Graph gets deleted from your warehouse or when the primary key column no longer exists. An alert banner will be displayed on the Data Graph landing page. The banner will be removed once the issues are resolved in your warehouse and/or the Data Graph. You will also have the option to trigger a manual sync of your warehouse schema.
Receive alerts for warehouse breaking changes
Configure alerts for breaking changes to receive notifications over Slack, email, or in-app notification whenever Segment detects a breaking change in your warehouse.
To configure alerts for breaking changes:
- Open your workspace and navigate to Settings > User Preferences > Activity Notifications.
- Select Data Graph.
- Select one of the following notification methods:
- Email: Select this to receive notifications at either the email address associated with your account or another email address that you enter into this field.
- Slack: Select this and enter a Slack webhook URL and channel name to send alerts to a channel in your Slack workspace.
- In-app: Select this to receive notifications in the Segment app. To view your notifications, select the bell next to your user icon in the Segment app.
- Click Save.
This page was last modified: 11 Jun 2025
Need support?
Questions? Problems? Need more info? Contact Segment Support for assistance!